
Poly-Tube Down Air Mattress - DAM - Part 37 to 54
Part 37 -
Querstion:
What about a Great Kilt with sleeves sewn in to use as an Air Mattress at night.
You could have a matching set of bagpipes to use as pillow and tentpoles at night.
Answer:
I made a design for a Great Kilt/Ait Mattress/Poncho and have a paper pattern for one. I just don't have the material I want to use for it yet. I would make Down baffles for the Poly Tubes for when it is cold. It would be made in a way that it could be turned it into a Down filled Poncho type (like a Down blanket turned into a Poncho) thing for rain or cold days but not while using it as a Kilt. Then turn it into your Down Air Mattress or regular Air Mattress at night.
I also have thought about filling the Poly Tubes up with water when near a stream or large water source and using the air mattress as a water bed (without the Down). Laugh and get it out of your system and then think how nice it would be to sleep on a water bed out in the woods. I haven't tried to fill a Poly Tube up with water yet but don't see why it wouldn't work. You could get up in the morning and use the warm water for a shower and hike on.
Maybe I can come up with a way to turn a few of sections on my Trekking poles into the bagpipe "pipes". Make a special stuff sack for the bag part. I think I have had to much coffee this morning.
Part 38 -
Question:
Regarding the pump. In early metal working, prehistoric britains used a type of bellows that consisted of a leather bag with a large opening, like a mouth with two lips made from sticks flattened on one side. By opening the mouth, air would fill the bag, and by closing the two flat wooden faces together, a seal would form and the air could be pressed out. This could be a possiblility for you, perhaps using 'popsical' sticks and poly stude or sil-nylon.
I hope this is clear.
Answer:
Hi ditchfield, Thanks for the information. Are you talking about the pump for the bagpipes or the air tubes on the air mattress? I understand the bellows idea as I have watched blacksmiths work with something like you discribe. I never though about bellows for the air mattress till you mentioned it. I can see where a small bellows could work and might even be lighter than the small pump I have. I have a small air pump (2.7oz) made to blow up balloons if I want to carry it for the tubes on my air mattress. When using Down in the air tubes I might carry the small air pump and reduce the moisture from my mouth when blowing the air tubes up. If I could make a small bellows like pump I might go with a small wood stove for cooking and use the bellows to "fan" the fire also. I will do a little searching and see what I can come up with.
I have just enough Scottish in my famility that I might be able to make a noise with a set of bag pipes. I don't think anyone near me would call it music however.
Part 39 -
Question:
do you think you could post a full picture of the Warmlite DAM. Perhaps a pic with someone lying on it too. Thanks in advance.
Answer:
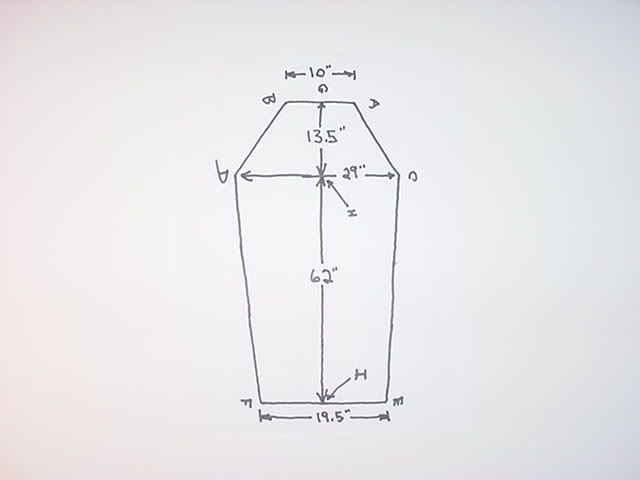
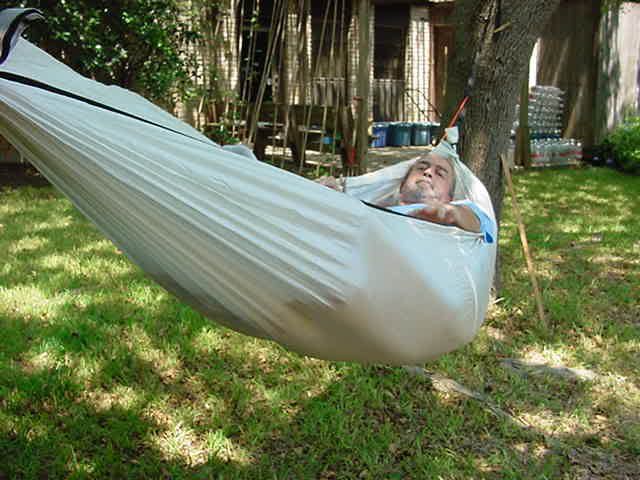
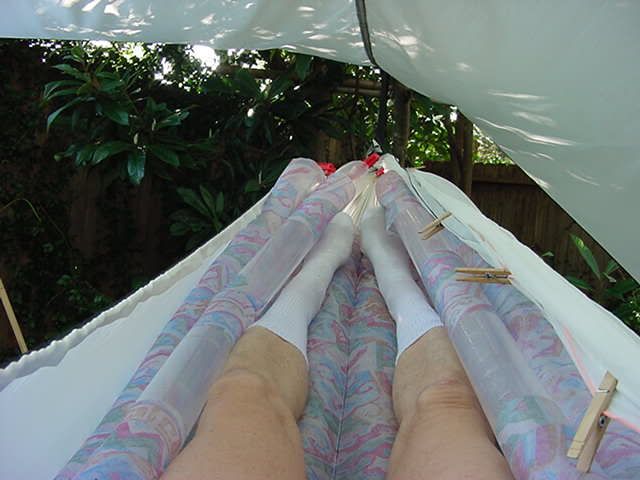
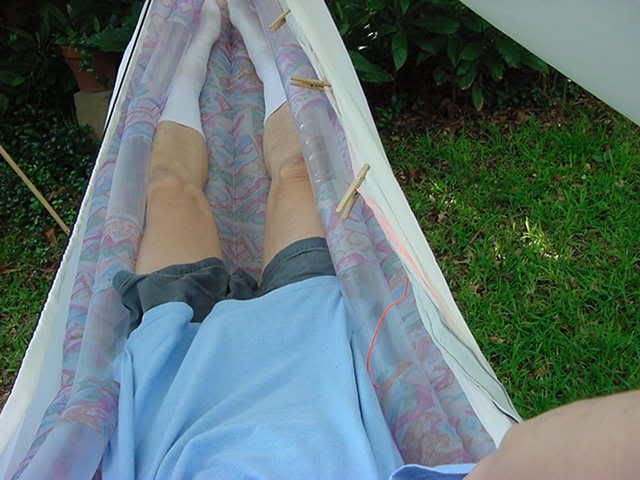
The Yellow air mattress is the Stephenson's Warmlite DAM in my Custom "Silk" Speer Hammock. This DAM is size (64) which means it is 74" long and is 26" at its widest part. They make 4 different sizes, 65"x 22", 70"x 24", 74"x 26", and 80"x 28". They can make one on a special order that is longer or shorter but can not change the width.
I am in the first picture but you can not see me. The Speer hammock is made to wrap around you. The other pictures I am holding myself up in the Hammock a little so I show.
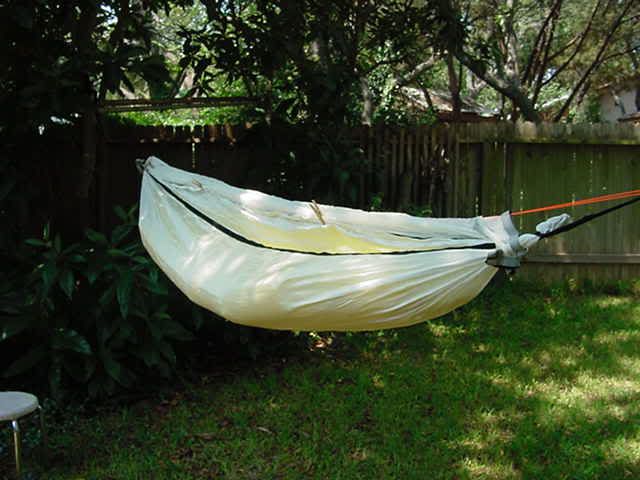
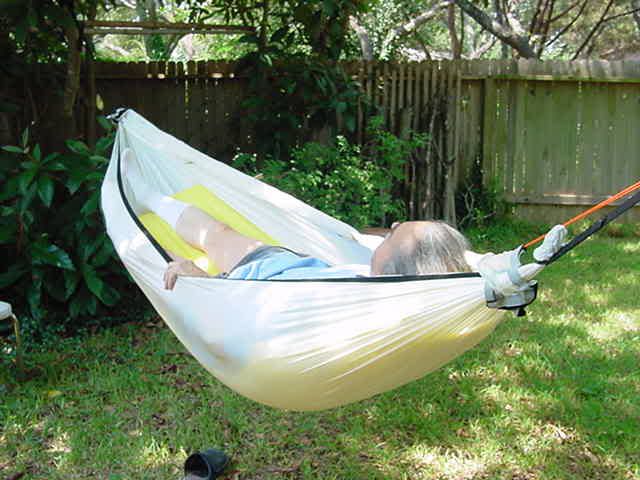


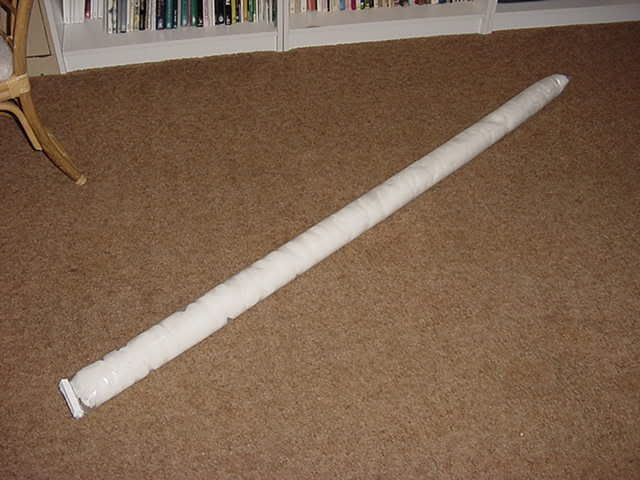
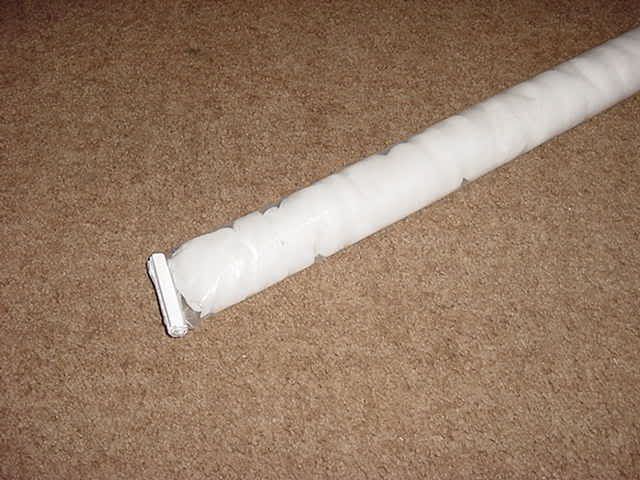
The following is my Poly Tube Air Mattress. It can be made longer or shorter and the width can be how ever many Poly Tubes wide you want it.
Part 40 -
Question:
Any reports on 3" flat tubing vs 4+ tubing? In a previous post you mentioned obtaining some 3" vs the wider stuff you used previously. I am at a point where I need to get some and am looking at http://www.jcdanczak.com/our_products/subcat_53.html
Advantage to 3": lower cost, less weight. Disadvantage: Inflated size may be too small; making for more tubes to inflate, loft can't exceed slightly >2". Advantage 4": fewer tubes, more loft, more uses around the house besides air mattress. Plus if you want smaller tubes you can just make the fabric sleeves smaller. Disadvantages: cost; you have to order 3,000 feet. This is only a labor of love for me, so I can’t justify buying 4500 feet of plastic that I will use only 50 feet of. I’m hoping to piggy-back off the experience of others in making my raw-material purchasing decisions.
I picked up an 8" impulse sealer at a yard sale for $5 and have been running around the house sealing stuff ever since. It’s a lot of fun.
Answer:
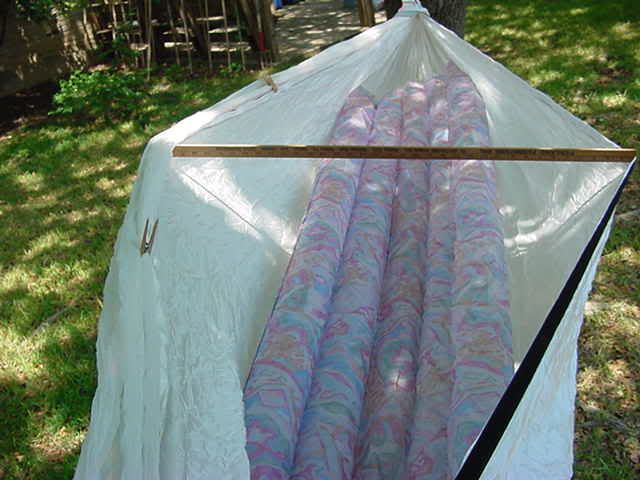
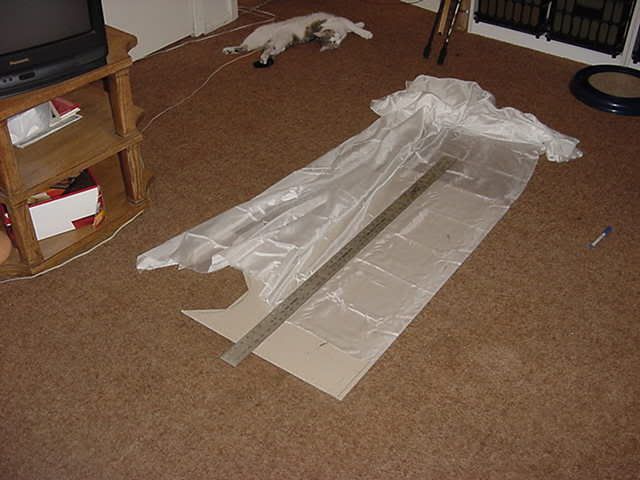
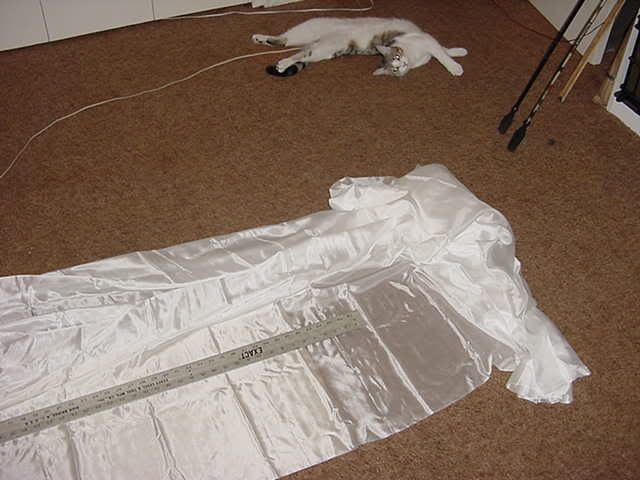
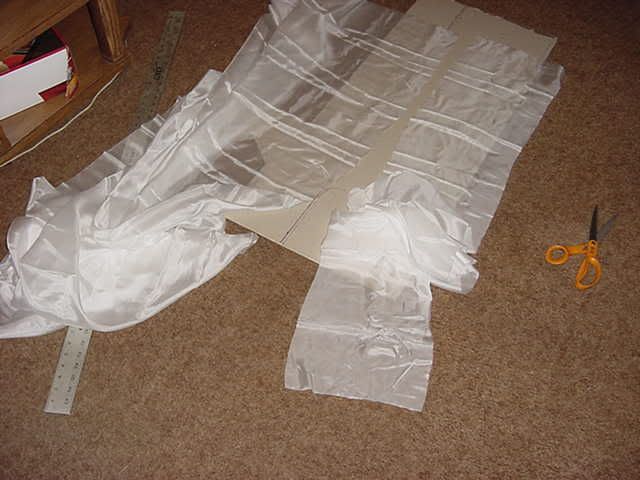
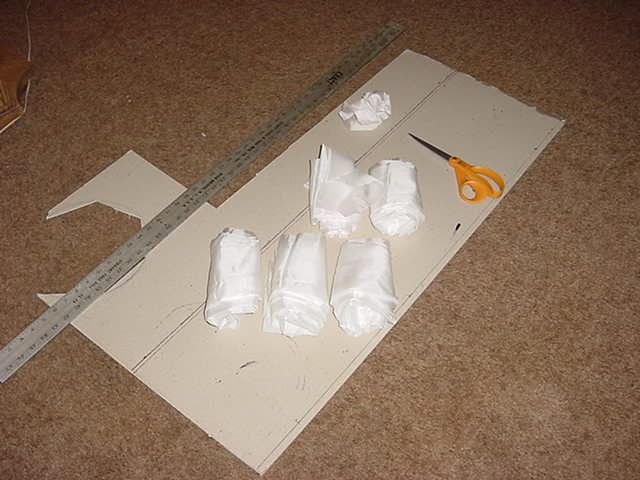
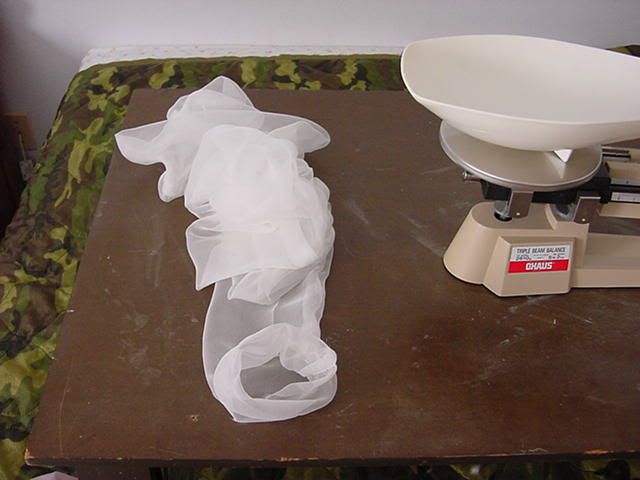
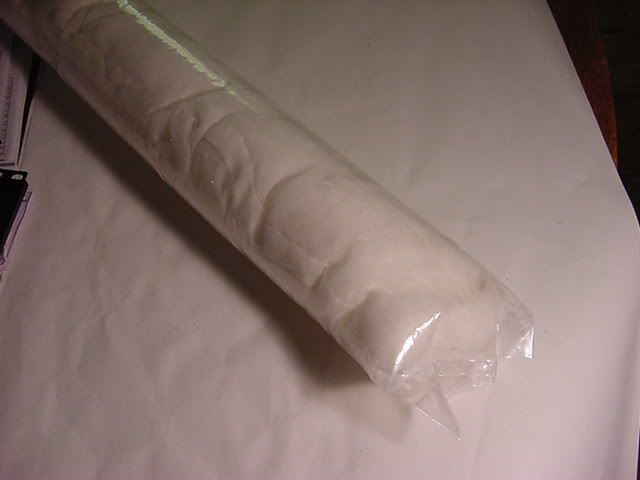
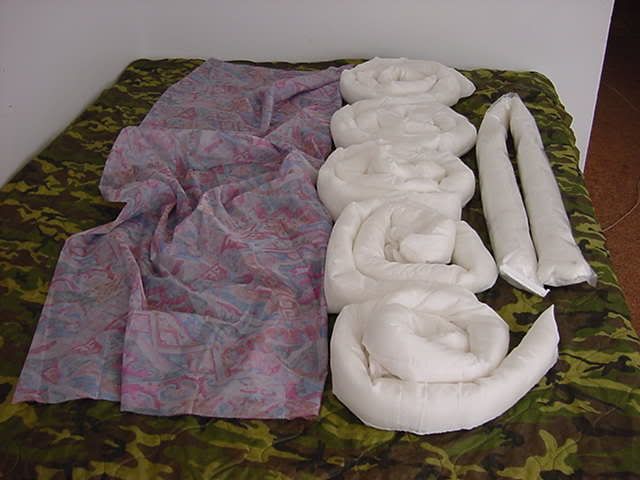
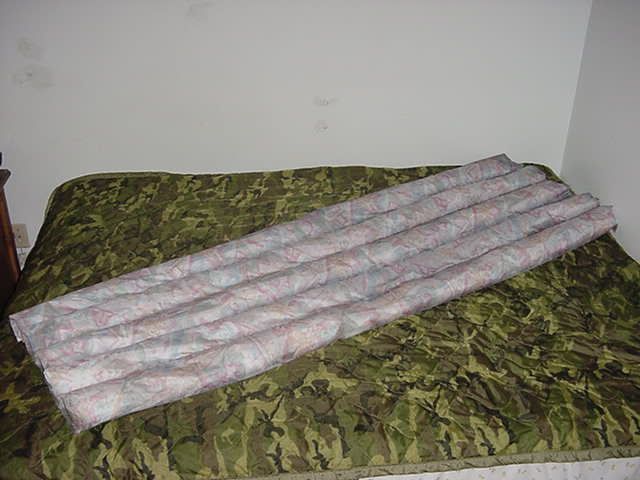
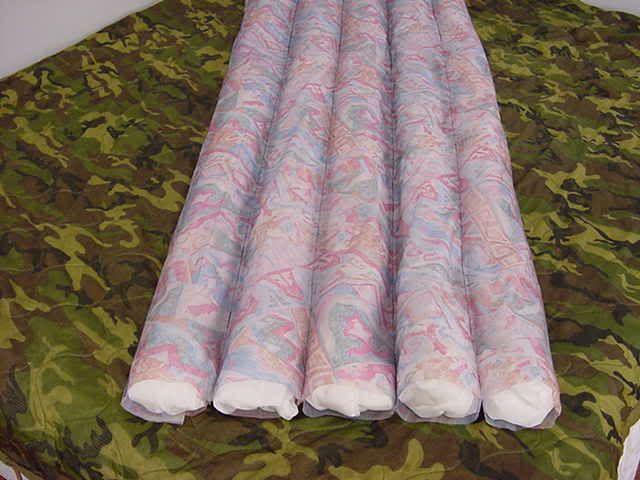
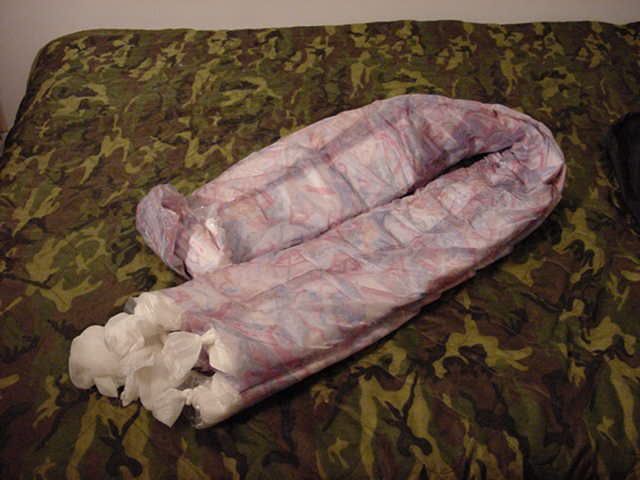
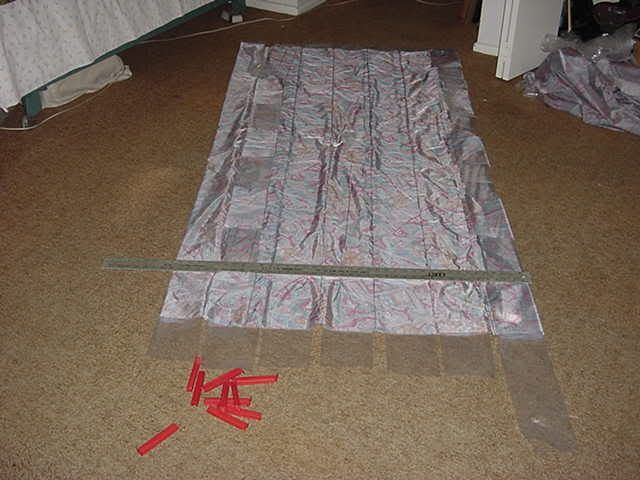
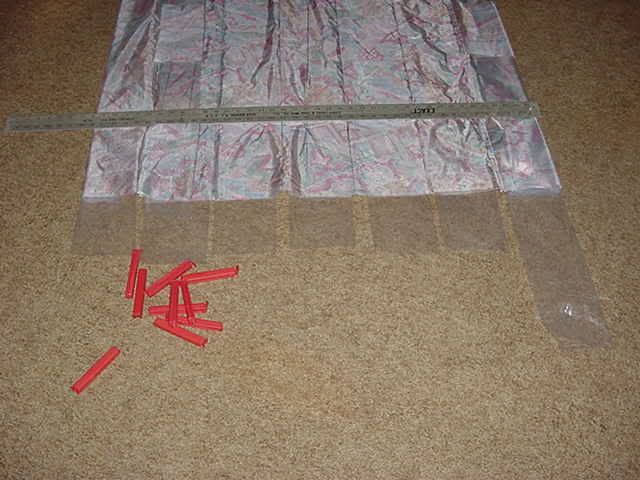
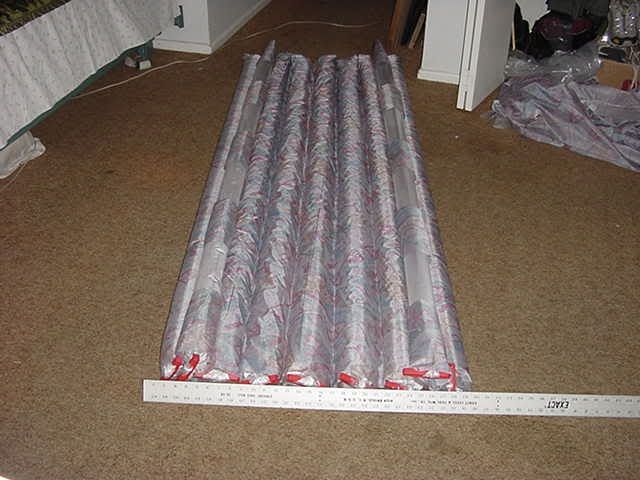
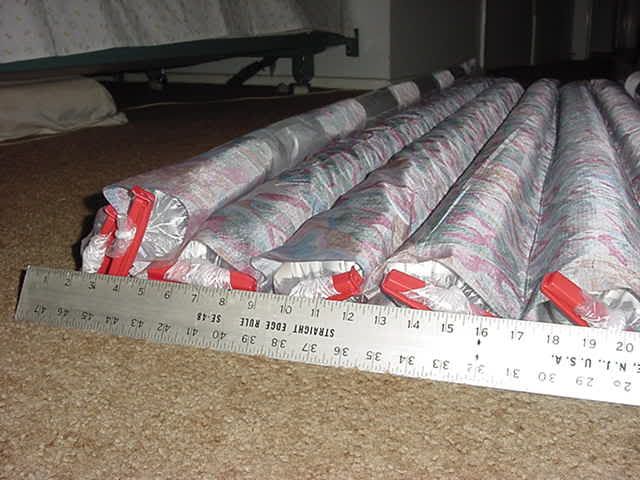
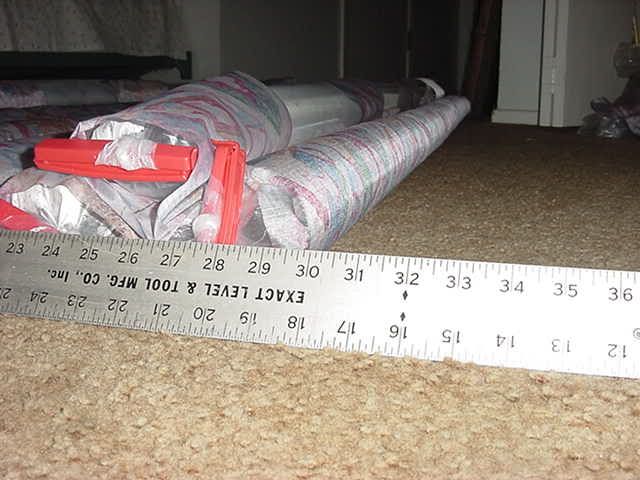
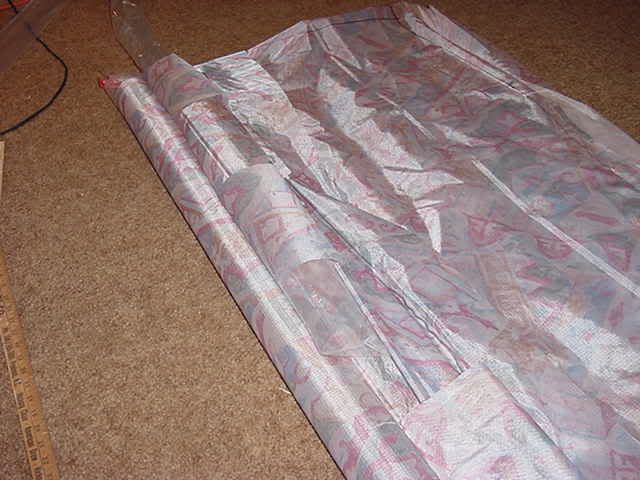
Funny I was just about to add some pictures of my first DOWN filled baffle. My Poly Tubing is 4" and 5". The 5" is what I am using because of the Down Loft. I thought about using the 4" for the top (as in like a sleeping bag) or if I wanted more tubes. I am putting 1oz of 800+ DOWN in each baffle. I think I am going to stay with the 5" so the DOWN has room to do its thing. If I don't give it room I might as well use a lower number DOWN. It also will all be the same if I want or need to change the DOWN baffles or replace the Poly Tubing for any reason. I think the 3" tubing will blow up to 2-1/2" and that isn't very big.
You got lucky with the impulse sealer. I will contune to get the tubing I need from this local person and he will seal the tubing anyway I want it. You could buy just what you need from the person I get mine from. It would cost about $8.00 plus shipping. I think that gets you about 80' of 4" or 5". I will have check his email and see how many feet that includes.
I have made 6 baffles and filled up one. There are easier ways to work with the lose DOWN than the way I did it. I was lucky and did avoid a disaster. I called AYCE at Thru-Hiker.com for some suggestions and he gave me a better way to fill the rest of the baffles.
Part 41 -
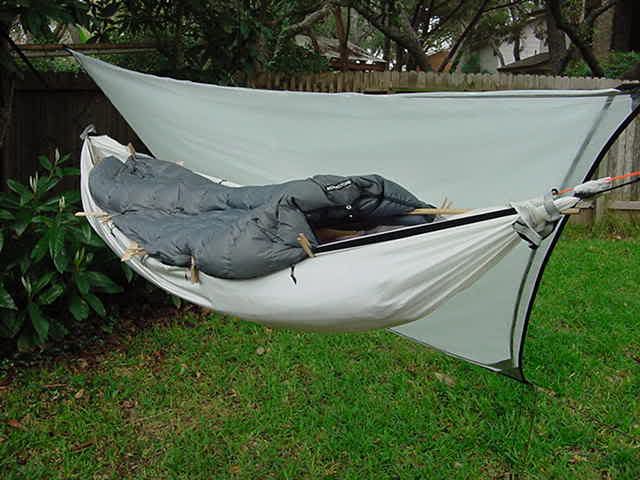
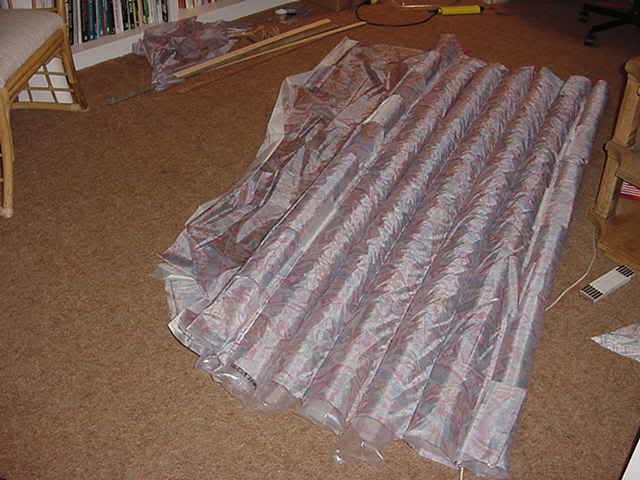
I have made and filled with DOWN the first of five baffle's for the DAM version of the Hyper-Light Air Mattress. The DOWN baffles can be removed from the Poly Tubes when it is warm. I have the rest of the baffles made and will fill them with DOWN on Friday. The DOWN Air Mattress will then be ready for a test at the local Ice Rink.
This will be a semi-scientific test. Sort of like the story of the Indian weather forcaster. Is my butt warm or cold, yes or no? The ice is about 22 degrees. I will also take my Stephenson's DAM to compaire mine with. I expect to do the test on Monday or Tuesday next week.

Part 42 -
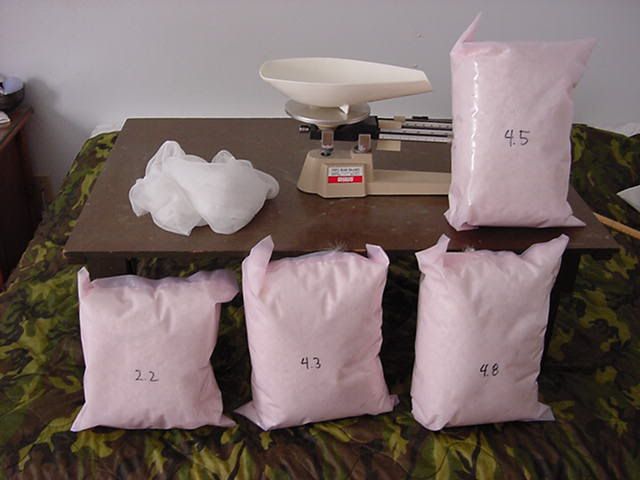
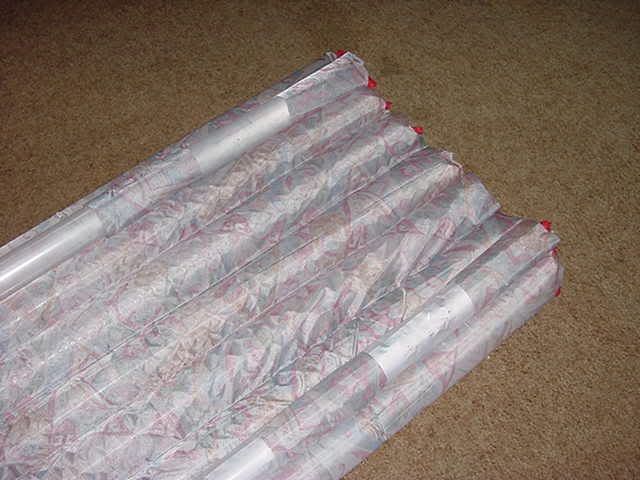
I have finished filling the Down baffles for my Poly Tube - Down Air Mattress. I filled 6 baffles as I may make another Air Mattress shell for 6 Poly Tubes. Working with the Down has been very interesting, that is code for I really can't tell you what I said once when my bedroom looked like a pillow fight had just taken place. You don't want to move anything to fast with Down around. I got smart real fast after that and the rest went ok. In the end I don't think I lost enough Down to measure. I got pretty good at filling the baffles but would not say I am on a "roll "yet. I have 10 onces of Down left and have starting thinking about how I am going to use it. I also expect to get more.
I got the Down from Thru-Hiker.com and it was really nice stuff. It has great loft.
I want to thank AYCE at Thru-Hiker.com for running a business where a customer can talk to him on the phone when they have some questions. He was a big help with the Down project and with questions I had when I was working with some of his Titanium.
It was a little cool here this morning so I put the Down baffles in the Air Mattress shell without the Poly Tubes. I got under it and used it like a small Down Blanket. I got nice and warm fast. My cat even like the new smell and we took a 2 hour nap.
I have a lot of ideas for using the Poly Tubes with and without Down. I am thinking about how I can muti-use the Air Mattress for other things. I want to have at least two uses for the Air Mattress. One for during the hiking day and then as an Air Mattress at night. I am open to any idea no matter how unusual it may seem.
I see what I have done so far as just a good start.
Part 43 -
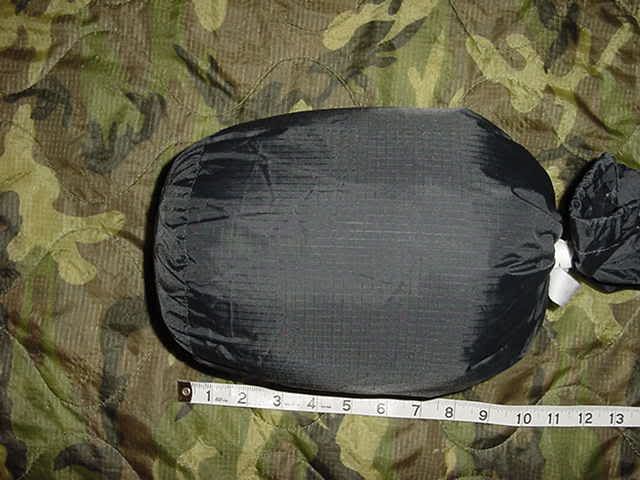
Question:
Can you post pictures of the whole works packed down? Also how are you going to pack the tubes? does it work better to remove the down tube and stuff it into a sack or does rolling the poly tube up with the down still in it get it just as small?
Answer:
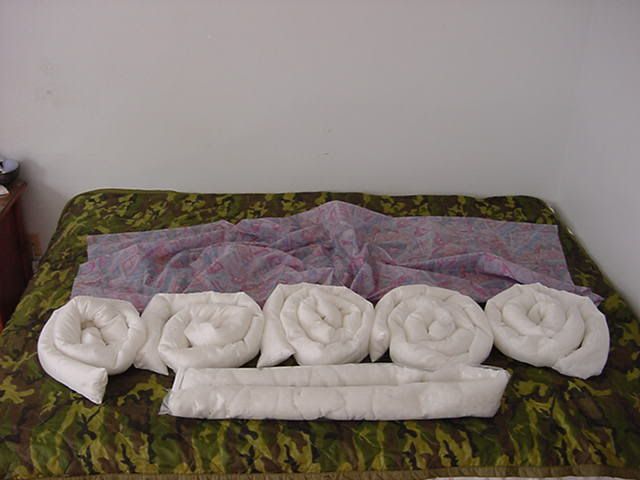
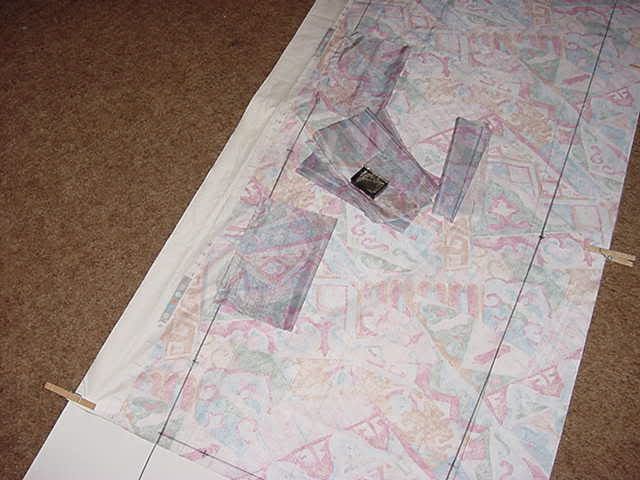
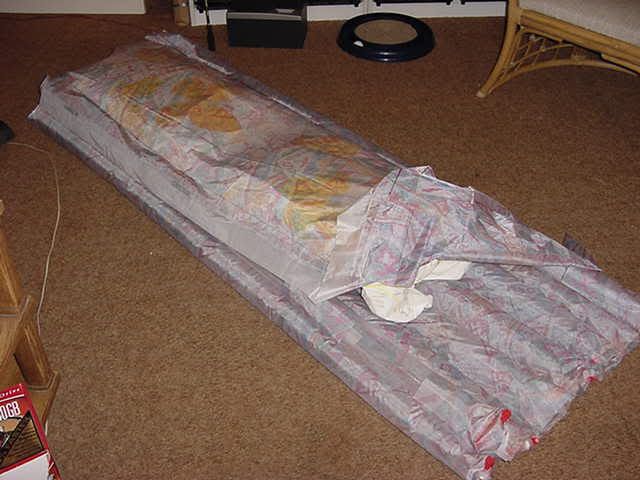
Can I call it "Packed-Up"? I have been asking myself those very questions. The practical side of me says pack each item seperate. The Hiker in me says "no way". What if it is raining when I get to where ever I am going to spend the night. By the time I mess around putting the Down baffles in the Ploy Tubes and then the Poly Tubes in the Air Mattress Shell and then blow up each Poly Tube something is going to get wet. If this is all so fragile I can't just let the air out of it in the morning and roll it all up, and stuff it in a sack, I don't want it. That doesn't mean I will not be careful with it, I will. This is hiking gear and not something for my bed at home.
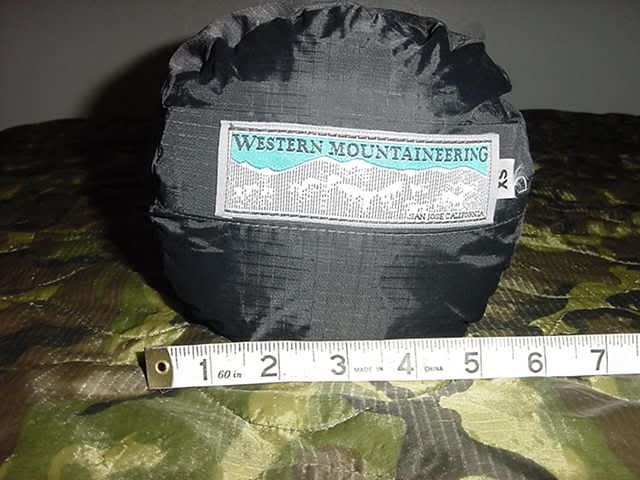
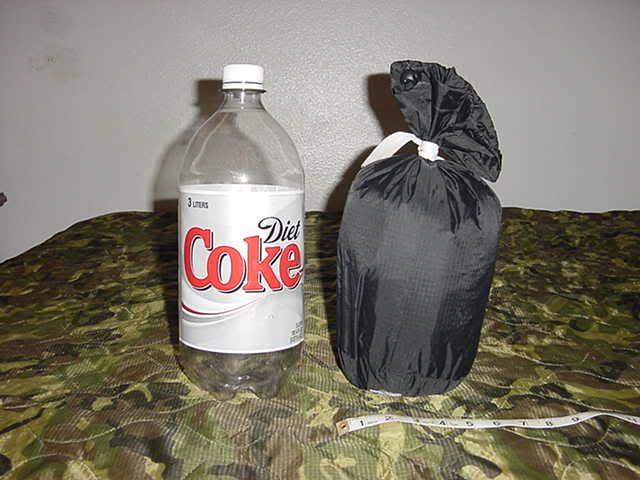
So the pictures are with everything in place just like I just let the air out. I folded it over a couple of times and then rolled it much like I might a Down Sleeping Bag. The Poly Tube stuff is very plyable, soft or something like that and rolls easy. The Down compress like Down does and the shell fabric goes along for the ride. The Black Stuff Sack (xs) is one that came with my Western Mountaineering Mitylite Down Sleeping Bag.
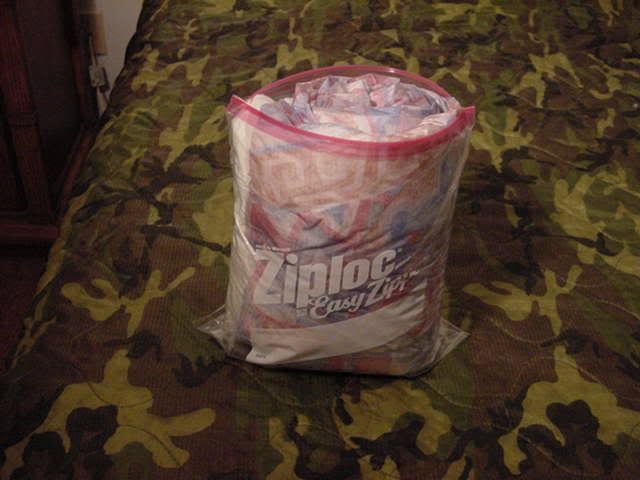
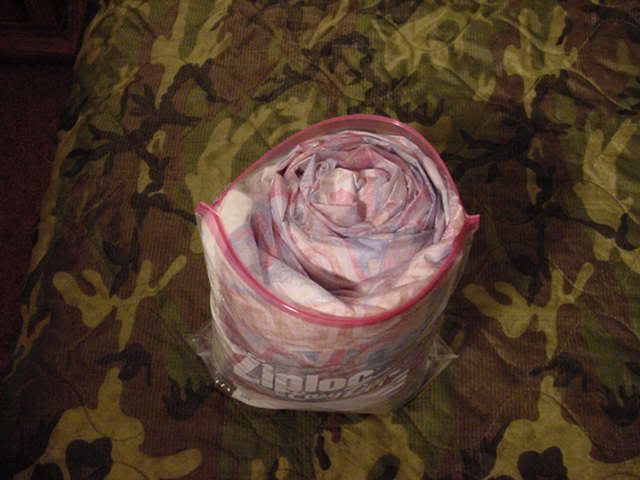
The Zip Lock is a 1 Gal size. The last picture is after I removed it from the Zip Lock Bag.
The size rolled for the stuff sack is 5" around by 10" long. It would make a neater package if I had some good rubber bands to put around it or tied it with something. For eveyday use I think rolling it to the full stuff sack size would be small enough. I don't want to be harder on it than necessary.
If I wasn't going to use it for a day or two such as a day in town I am sure I would take it all apart and let the the Down baffles air out.
Did I surprise you with an answer. I am glad you asked the question. You know the Poly Tube Down Air Mattress (14oz or less) is the Keystone to my winter Hammock stay warm system. My Speer Silk Hammock (12oz or less - no bug net) A Poly Tube Down Quilt (14oz or less) and my Large size Light weight Mac Cat Tarp (14oz or so). I expect to be warm down to 20 degrees, maybe less. If I am clever the Down baffles will also be used in some of my garments so some of this weigh is shared with other gear during the day.
Part 44 -
Question:
Thanks for all these details, the pics have been awesome! I am positive that this device is going into my kit for this winter. I am on staff for an Okpik (BSA Winter Camping) training in the Adirondacks in January, and I'd like (love) to add cold weather comfort in hammocks to the curriculum. I never could get comfortable on the ground, winter or summer, and this looks like just the trick for the hammock.
Two questions:
Blowing it up - I have looked at all manner of manual and portable battery-powered pumps. I assume that using your breath would introduce too much moisture into the down, correct? Obviously, I am not an ultralighter if I am considering carrying a pump. Also, pumps allow for sucking the air OUT when packing, maybe making it easier to pack? Your thoughts?
Sealing the ends of the poly tubes - did you go with the bag clip, as shown in one of your pictures, or the overhand knot you had spoken of in earlier posts?
Again, thank you for sharing all your design and assembly insight. Looks like you did a good vacuuming job after making the baffles - nary a feather in sight!
Jonas
Answer:
I had to laugh at the feather remark. It really wasn't that bad. You just have to work where you can make sure that there is no breeze blowing. That also means NO quick movement on your part. I did one baffle the first day then I did the other five. So I had fun with the first one then got serious and did the other five real carefully. I filled the baffles by hand. There are other ways to do this but I have a lot of patience. You just need to take you time, it worked OK. I will be making more baffles and expect to use this same way for all the rest. I am not working by the hour. The Army Poncho Liner surface is slick so any down that got away was easy to pickup.
Blowing up the Poly Tubes. I have a small balloon pump that weighs 2.7oz. but I don't know if I would take it to the woods just for myself. If you are hiking with a group that is using something like this a small pump would be a good idea. I have been blowing the tubes up by my breath. Once the Down baffles are in the tubes it doesn't take much air to fill them. Also if I think the Down is getting damp I can pull the baffles out of the tubes and let them air out. The Poly Tube are very easy to get the air out of once the clamp is removed.
Sealing the ends. Yes, I am using the bag clips. The knot worked fine but does add some wear to the Poly Tubes and takes a little while to un-knot. Think about cold fingers and trying to un-knot something. The clips are quick and five clips weigh 2oz.
Part 45 -
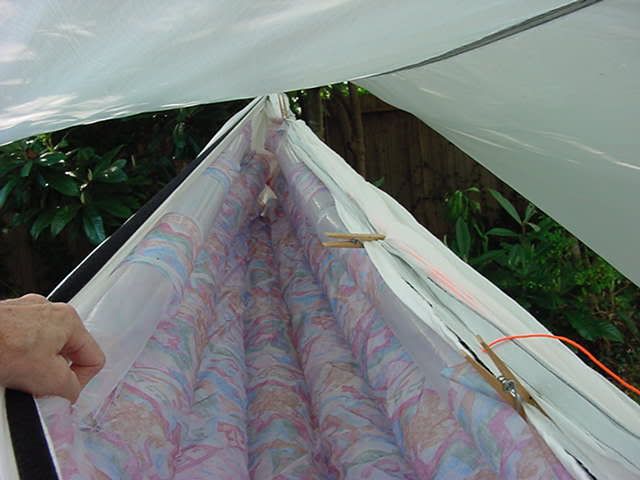
It got a little cool here in San Antonio, Texas the end of last week. Low of 47 degrees or so. Yes, I know that really isn't very cool but it hasn't been that cool since last April. Anyway I tied my Mac Cat Tarp to a couple of trees in my backyard and tied my Silk Speer Hammock just below it.

The next morning at about 0500 the temperature was about 51 degrees when I had everything ready. I put the DAM into the hammock alone to see how the DAM felt. I have a small IR Thermometer. The temperature under my butt got up to 71 degrees fast. I then got my WM Mightlite (40 degree) sleeping bag and using it like a quilt I got under it. The temperature went up fast and leveled off at 85 degrees at the foot end, 89/91 degrees (top and bottom) in my mid-section. After awhile I checked the temperature outside the hammock under my butt area bottom of the downward curve). It was 71 degrees. The outside temerature was still 51 degrees.
With the 5 Poly Tubes the DAM doesn't really wrap up around your body much. For warmer temperatures I don't think it makes much difference. I want to be able to use my Hammock down to "0" degrees if I want. Laying in the Hammock and thinking about this I decided to add 2 more Poly Tubes. That should wrap the DAM up around me and come up just below the top of the hammock. Attaching the "top" cover (what ever I decide to call it" could seal against the outer Poly Tubes and help avoid cold spots at the connection point. I found a "Data Table" at Thru-Hiker.com that gives the inches of (for Down) loft per a given temperature.
"From Thru-Hiker.com: Comfort Rating in Degrees Fahrenheit
Respective Loft Height in inches (DOWN)
40 degrees - 1.5" loft
30 degrees - 2.0" loft
20 degrees - 2.5" loft
10 degrees - 3.25" loft
0 degrees - 4.0" loft" Thanks AYCE
For "0" degrees I will need 4" of loft for the top part. The Poly Tubes are 3-1/2" so that is pretty close for the sides and bottom. The 7 Poly Tube DAM takes on the shape of the inside of a canoe when I am the hammock. Thinking about that I thought I could make the Down Top cover a little like a canoe cover. The top would attach completly along one side and about 2/3's of the "get-in" side. Making the top like this should be easy as it will sort of sit on the Poly Tube sides. The sewing for a top cover like this should be pretty simple, more or less flat. A top like this should also be easy to swap out for another one of less loft for a temperature of say 20/30 degrees. I expect to do a lot of "cut and paste" for the foot end to get it big enough but not to big.
Part 46 -
I should have a first draft of the DAM cover and a way to connect it to the DAM sometime today. I have been hanging out in the hammock making some measurements to make a rough pattern for the top cover. I put this old Moonstone Down bag liner over the hammock for a size check.

Part 47 -
Question:
I think what you're working on is really cool--but are you losing sight of a goal of hammock camping, which is weight savings? By the time you make a sleeping mattress that is this big and cozy, why bother with the hammock when you can use a bivy and tarp with your comfy mattress for less weight? Or maybe I'm missing something in the calculations.
Vince
Answer:
Good question, but I want to use my hammock down to "0" degrees. I don't want to sleep on the ground. Maybe a better way to put this is I want to see what it takes to sleep in my hammock at "0" degrees. Big doesn't have to be heavy. Each Poly Tube 78" long and complete with 1oz of down in a baffle weighs 1.5oz. This gives me a loft of 3-1/2". The shell material is .70oz per square yard. When I get one done and refined to get ride of all unnecessary weight then I can decide if it is worth it. I have the option at some later date to also say "why bother" down to "0" degrees.
I know I can use the DAM or just a Poly Tube "Air" only mattress in my hammock between 30 degrees and up to whatever. This is with a light Down Quilt over me. The weight of my Silk Speer Hammock is 12 to 15oz if I dump the bug net and Velcro. I also can make a new Hammock of a little lighter Silk. For an April AT start my Tarp (12.6oz) my hammock (12oz) a Down Quilt ( 12 to 14oz) Poly Tube - Air only mattress ( 5 or 6oz) (45oz or less) when I need it all. I think I can get that total weight down less than that when I get the "0" setup done.
What ever comes of all this I have learned a lot. If you recall early on I talked about also using the Down baffles in the clothing necessary for cold weather. If that works out some of the weight will be used each day for at least two things.
My over all goal is a very light gear setup that provides more comfort than the light/ultra reduced size gear some are using. The bottom line is not so much what one item might weigh but the total pack weight. At some point in the next few years I want to do an AT Thru-Hike starting in January. The first one I guess will be a NOBO hike but I really want to go South. If I can make some winter gear that is very muti-purpose I hope to save a lot of weight on my total winter gear setup. I haven't talked much about what items I want to share the Down with but I am doing a lot of looking in my local stores.
Part 48 -
Question:
Looking good. I think 0 F is a good target.
I have never slept in a hammock but I think it may have advantages in extending a hammock to wet winter conditions, which effectively end by about 20F but temperatures can still crash to 0F. The beauty of you system is it will work on or off the ground, but is more comfortable and warmer than 2 blue foam pads and lighter less bulky packed than 3. Less robust perhaps, but field repairable. Longer to setup and teardown would be my greatest concern in winter when I might stop and go several times a day and night. Perhaps it biggest weakness might be that it is just too darn comfy and I won't want to get up and go skiing no matter how bright the moon is.
Answer:
Hi JAK, "less robust, but field repairable" As a "do-it-yourself" project I don't think "less robust" will be much of a problem to the person that made it. "field repairable" carry a couple spare Poly Tubes, an extra clip or 2, a needle and some thread, a little duct tape and I think I could fix anything that might come apart. The clips are stated by the company that makes them to be good for 100,000 open and closings. If I had to I can always go back to the popsicle stick clip.
I have hiked in the snow at night with a full moon or with a lot of moon light. I think they were all planned ahead of time. I hope the setup time will be about the same as someone setting up a tent. Tarp, Hammock and Poly Tube (what ever) has to be simple enough not to take to much time. I have a couple of ideas for a new hammock that would have the Poly Tube setup built into it. I would just have to hang the tarp and then the hammock. Blow up the tube that would open all at one end and outside the hammock. I also have been using my little balloon pump more and more. It is only 2.7oz.
This afternoon I finished part of the top cover. The cover will be 2 piece (inside fabric - Down - outer fabric. I am working on the inner side first. This is connected to the DAM in the way I planned and made to be removable. The finial system should have 3 top cover pieces. This first one for "0" degrees, a second one for "30", and one for "50" degrees. All the top covers will use Vertical Baffles and use the "loft" guide from the Thru-Hiker site. I am sure I will over-fill the 2 covers for the lowest temperatures and will ask for some guidance when I get to that point. I am trying to do the math to see how much Down I will need for the "0" top cover. Tomorrow I am going to put everything back into my hammock and try to get a closer measurement for the top cover I made today.

I hope this all turns out so warm and comfy that I get a real good nights sleep after a great day or night playing in the snow. I am not a fanatic hammock hanger and on a winter AT Thru-Hike I might even spent a night or 2 in a shelter.
Part 49 -
Question:
Here’s another idea for a valve: Kayak float bag valve. The one pictured is from my old flotation. It has 3” of tubing and weights about 7 grams. You could get by with less tubing so it would weigh maybe 4 or 5 grams . I wrapped a rubber band around the bag/tube to hold it. So far it seems to work well.
Valve at: www.nrsweb.com/shop/product.asp?pfid=3875
I haven’t bought any from them.
Answer:
I like your idea. I called "NRS" and ordered some values to play with. The nice thing about the way you connected the valve to the poly tube is I could still open the tubing up and take the Down Baffles out if necessary.
I am trying to get my Down "Top" attachment for the DAM version finished. Maybe by Monday.
Part 50 -
Question:
OK, I have a question about the plastic utilized in the Hyperlight DAM. You mention that you use a 2 Mil poly that comes in very large rolls.
Is there anything special about this poly?
The reason that I ask, is that I was recently buying dropcloths for staining my deck, and I noticed there was a wide variety of poly plastic sheet cloths. They come in 1 mil, 2 mil, 4 mil and 6 mil varieties at that particular Home Depot.
I know that you had mentioned that you had to go through an intermediary to get your hands on the material. I was wondering if this stuff would work.
http://www.homedepot.com/prel80/HDUS/EN_US/diy_main/pg_diy.jsp?BV_SessionID=@@@@2141584640.1101854685@@@@&BV_EngineID=ccedadddeldlkjlcgelceffdfgidgkj.0&CNTTYPE=PROD_META&CNTKEY=Super%20Categories/Home%20D%E9cor%20%26%20Organizing&MID=9876&pos=p04
Its all very cheap, and it looks like it would be fine to use if you had the requisite heat sealer ( I do not, but I am looking into to building a Hyperlight DAM or SAM).
Hopefully this helps you and other out. "
============================0=================================
I have decided to answer your question here to keep the thread together. The Poly Tube can be found at a lot of places on the internet. Do a search for "flat poly tube". I looked at the web site above but it seems to just open to the store catalog. Are you thinking of using flat sheet drop cloth material? How will you make tubes that can be blown up?
I may not understand what you have in mind.
Part 51 -
Question:
OK, I have a question about the plastic utilized in the Hyperlight DAM. You mention that you use a 2 Mil poly that comes in very large rolls.
Is there anything special about this poly?
The reason that I ask, is that I was recently buying dropcloths for staining my deck, and I noticed there was a wide variety of poly plastic sheet cloths. They come in 1 mil, 2 mil, 4 mil and 6 mil varieties at that particular Home Depot.
I know that you had mentioned that you had to go through an intermediary to get your hands on the material. I was wondering if this stuff would work.
http://www.homedepot.com/prel80/HDUS/EN_US/diy_main/pg_diy.jsp?BV_SessionID=@@@@2141584640.1101854685@@@@&BV_EngineID=ccedadddeldlkjlcgelceffdfgidgkj.0&CNTTYPE=PROD_META&CNTKEY=Super%20Categories/Home%20D%E9cor%20%26%20Organizing&MID=9876&pos=p04
Its all very cheap, and it looks like it would be fine to use if you had the requisite heat sealer ( I do not, but I am looking into to building a Hyperlight DAM or SAM).
Hopefully this helps you and other out. "
============================0=================================
I have decided to answer your question here to keep the thread together. The Poly Tube can be found at a lot of places on the internet. Do a search for "flat poly tube". I looked at the web site above but it seems to just open to the store catalog. Are you thinking of using flat sheet drop cloth material? How will you make tubes that can be blown up?
I may not understand what you have in mind.
Part 52 -
Question:
How can I make my own? Do you have instructions or tips?
Also, if I buy one from Stephenson, I tell them how tall and wide I am , or my sleeping bag, and they will custom make one for me? I'm 5'8" weigh 160, and have a WM Megalite bag. Is it really 3-4 inches deep? That's awesome, as the exped is only 2.8" deep.
Thanks for the feedback.
AG
Answer:
android, You should find everything in this thread you need to make a DAM such as mine.
Stephensons makes 4 different sizes of their DAM. It is possible or was possible to get one made longer or shorter but not wider. You will get 3-4 inches in depth but as you blow more air into the mattress it starts to get harder and is less comfortable. The Stephenson's DAM is "awesome, but is also heavier than my home made one.
Part 53 -
I have been plugging away on my "0" Degree DAM / Sleeping System since I completed my recent medical treatment. The last pictures I posted were back in October 2004.
I now have a completed prototype ready for a test in the woods. It still uses the same $1 a yard ripstop from Wal-Mart. If everything works out I will make the real thing out of some much better and lighter material. For now however it weighs a little more than I want the final version to weigh.
Remember this is a system that should be good down to "0" degrees or maybe lower. I use a total of 30 ounces of 800+ Down in the three parts:
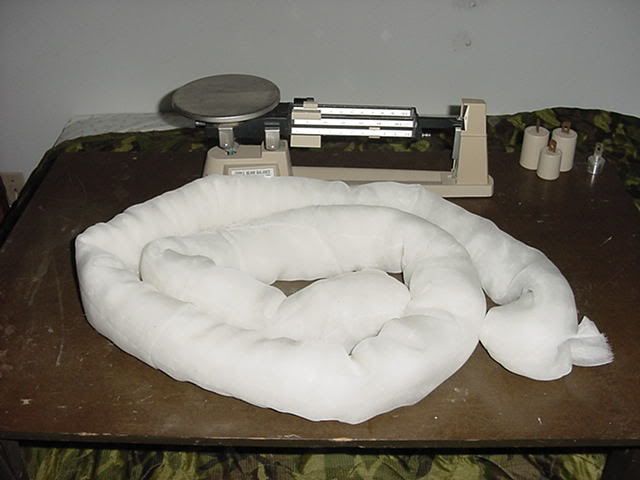
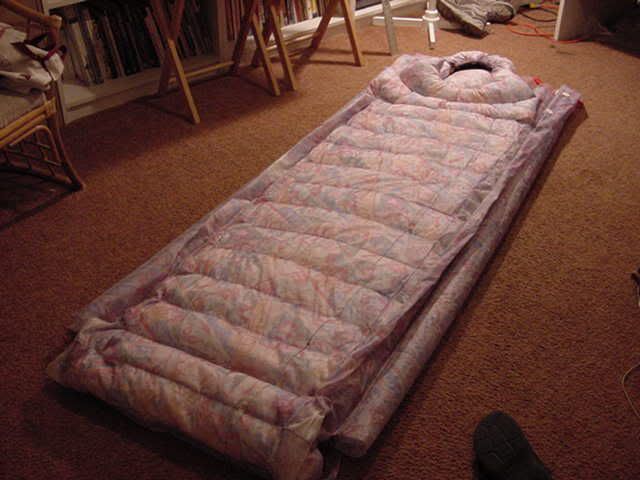
The current DAM uses 9 poly tubes each with a silk baffle and 1oz of 800+ Down. The weight of one Poly Tube with the baffle and Down in it is 1.5oz. This then is 9 times 1.5oz for 13.5oz. Counting the shell material the current DAM weighs 23oz. The size is 78" long by 33" wide. This size fits nice INSIDE my silk hammock.
The Down Top Cover has 18oz of 800+ Down in it for 4 inches of loft and a total weight of 22.82oz. The Top Cover is buttoned onto the DAM along the sides and foot end. Each edge of the DAM has a poly tube roll to act as a seal to avoid cold spots. The width of the cover is 25". This is more than wide enough inside the hammock. I can lay on my side if I want and do sleep on my side most of the time in my hammock. I made sort of a collar for my neck. I also made a removable Down Cap (2oz of Down) to use when it is cold enough. The Down cap can be worn anytime in or out of the DAM. It has a draw cord for the neck throat area. I made the Top Cover so I can remove up to half of the Down baffles so I can use it in warmer weather. This way I can use the same Top Cover all year round. The picture shows the clamps on the poly tubes at the head end of the DAM. I am thinking about getting a longer set of Poly Tubes and put them in the head end. They would stick out like in the last pictures and be easier to pump up and let out the air.
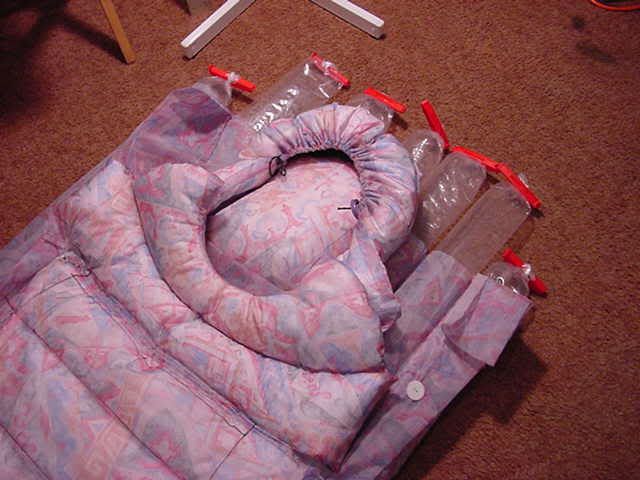
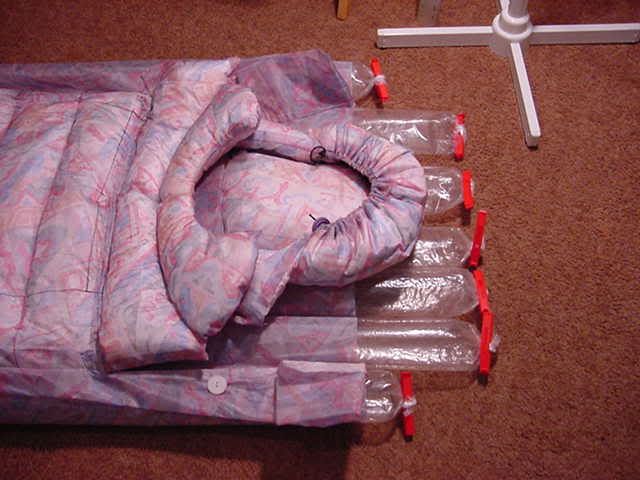
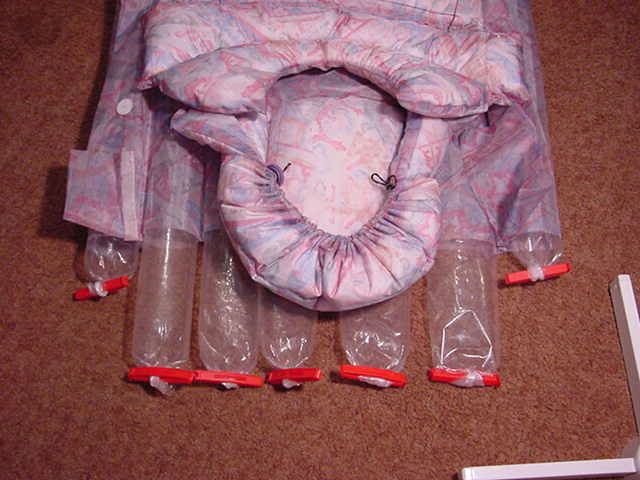
Part 54 -
I have been more or less out of the hiking loop for the last year. For the last 9 months I haven't had time to work on my Poly-Tube DAM/Sleep System. The first protype is finished however. Now that I may be able to hike again in a few months I hope to complete a second generation DAM/ Sleep System prototype for testing this winter. This second version will use the lighest weight material that I can "get/that work" to bring the weight down as low as I can. This version is based on the need to stay warm in my Hammock down to at least "0"F. A second version will be made for a temperature of around 30 degrees F for milder weather. I have been a little below 30 degrees F in my Hammock so that part is easy and I will just work on making the system lighter.
posted by gardenville @ 11/07/2005 12:39:00 AM
![]()
0 Comments:
Post a Comment
<< Home